Contents
What is Voice AI in Workflows?
Before you start
The two Voice AI nodes
How to set up an Incoming Voice Call trigger
How to set up a Make AI Call action
Using call data in later workflow steps
Saving and turning on your workflow
Viewing call analytics
Limits to be aware of
Common issues and validations
Need help?
1. What is Voice AI in Workflows?
Voice AI in Workflows lets you add AI Voice Agent phone calls as a step inside the Workflow Builder. Instead of running voice calls as a separate module, you can place them alongside your existing WhatsApp, Email, Webhook, and Attribute nodes.
You can:
Place an outbound AI call when a business event happens.
Start a workflow after an inbound AI call ends.
Use the information collected during a call to drive the next steps in your customer journey.
2. Before you start
Set the following up in the Voice AI Agents module first:
Complete the Voice AI compliance registration.
Rent a phone number.
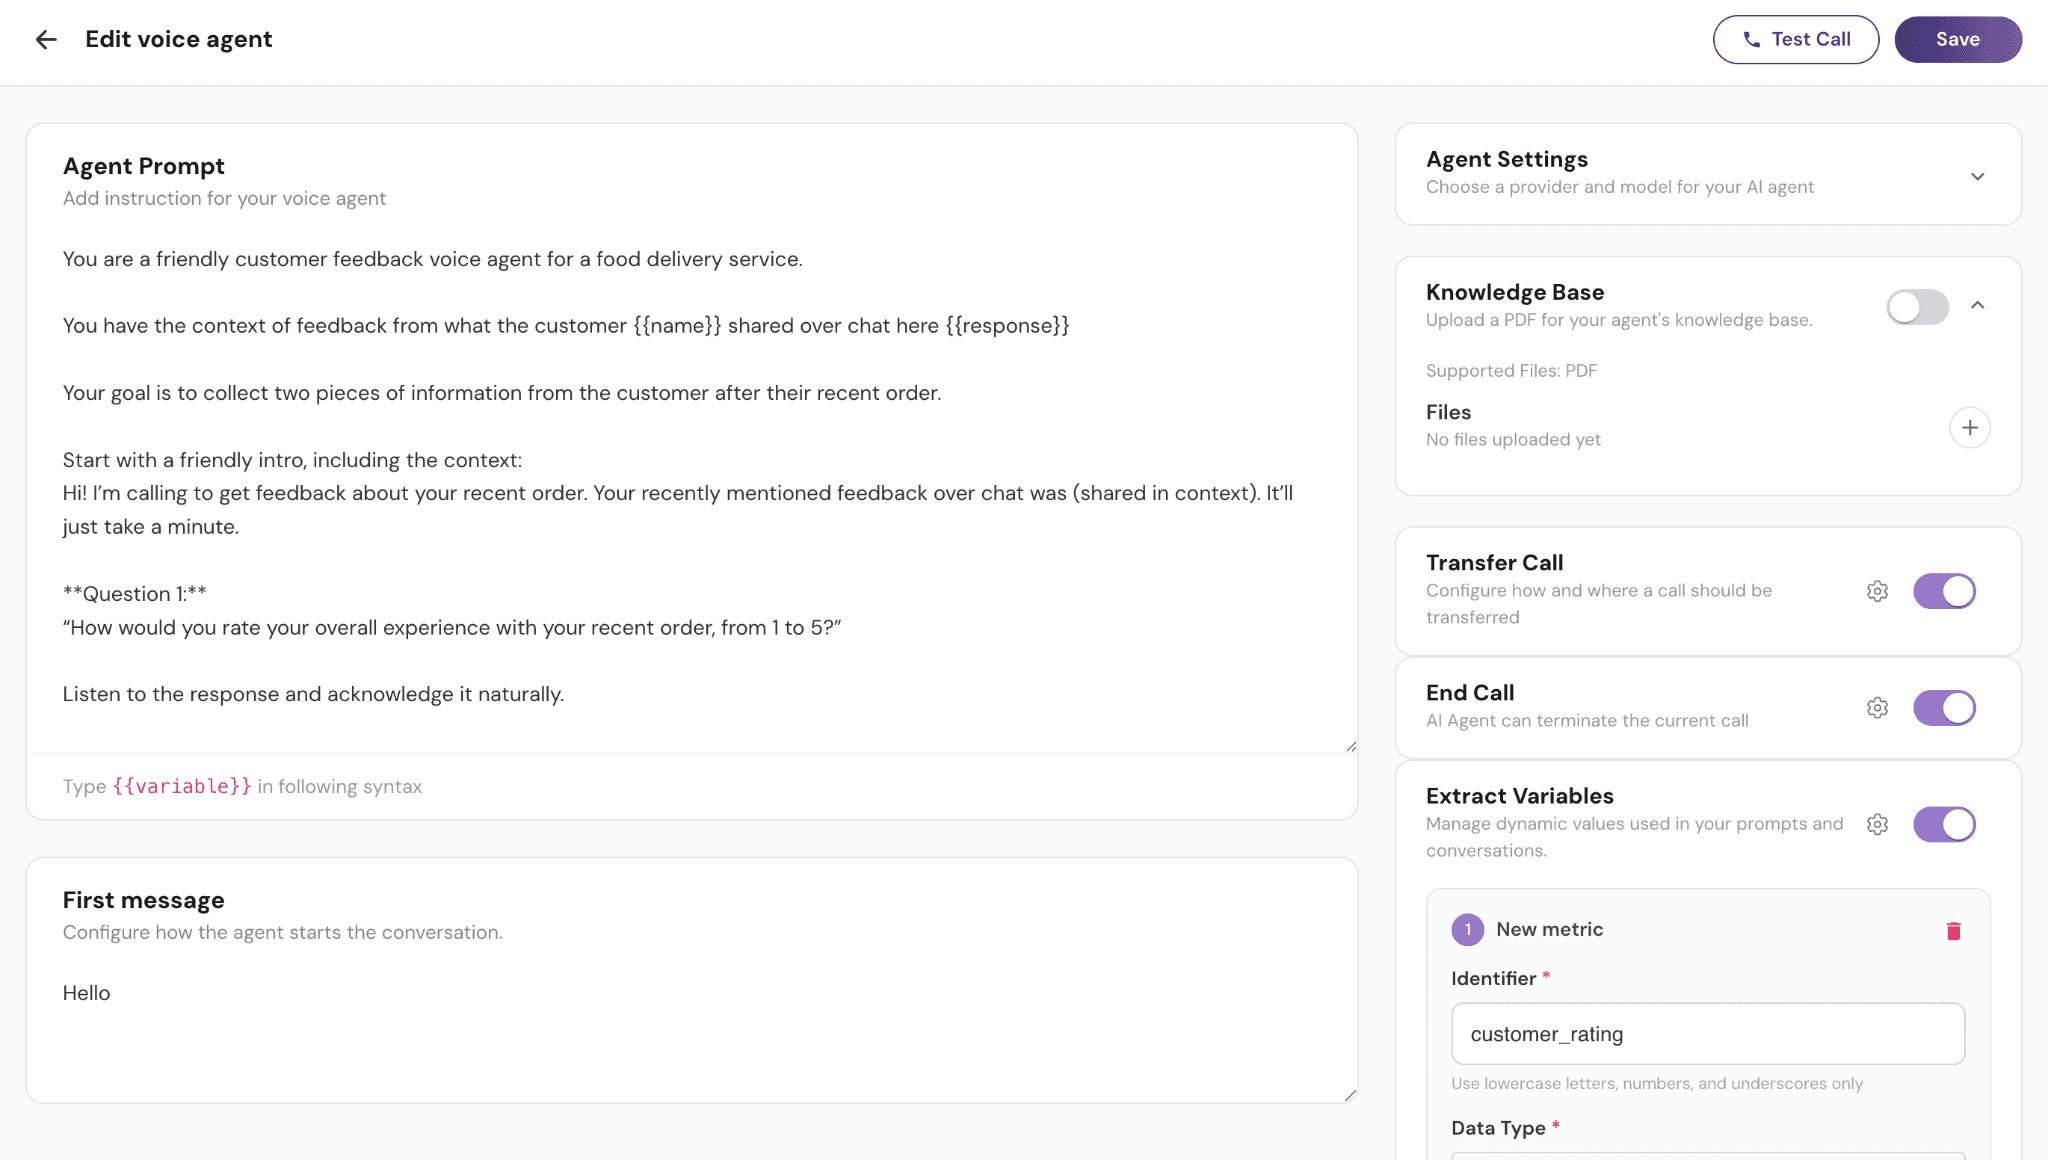
Create a Voice AI Agent.
Complete the agent configuration - name, model, language, and the call settings.
Define the output variables you want the agent to capture during the call.
For outbound calls, define the prompt variables the agent needs.
Link the agent to your phone number.
Note: Output variables are what carry call data into the rest of your workflow. If you do not define them in the agent, your workflow cannot use anything the call captured.
Note: If you have not registered for Voice AI, no agents or phone numbers will appear in the node configuration.
3. The two Voice AI nodes
Node | Type | Use |
Incoming Voice Call | Trigger | Starts a workflow after an inbound AI call ends |
Make AI Call | Action | Places an outbound AI call as a workflow step |
Both nodes work like any other workflow node, so you can connect them with your existing channels and logic.
4. How to set up an Incoming Voice Call trigger
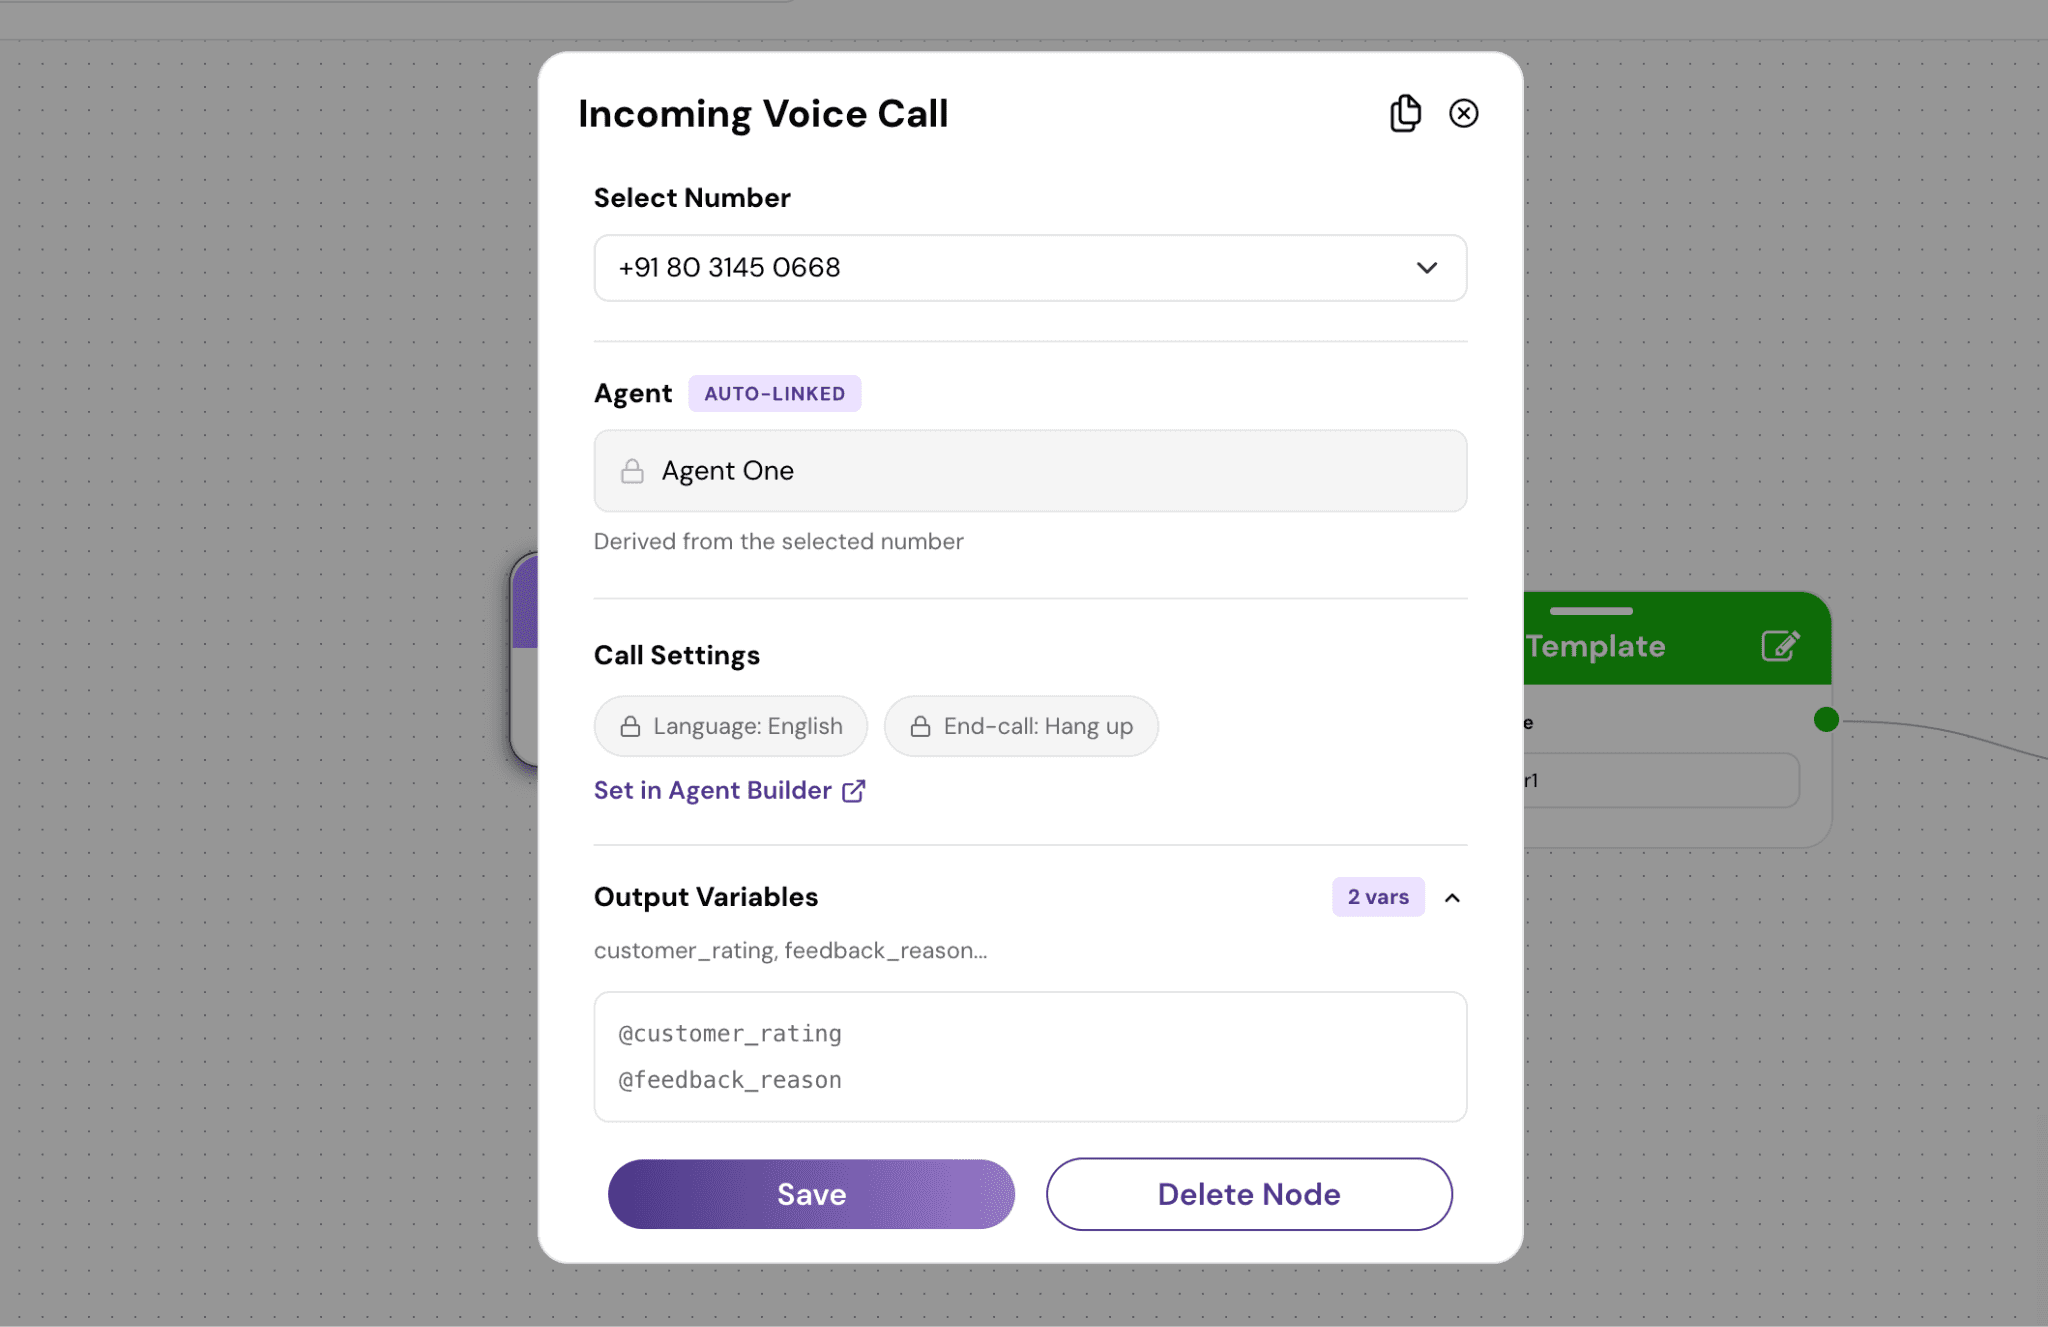
Use this node when you want a workflow to start after a customer's inbound call handled by your AI Voice Agent is completed.
Drag the Incoming Voice Call node onto the canvas.
Select the phone number from the dropdown. Only inbound-enabled numbers appear here.
Check the linked AI agent. It is selected automatically and shown as read-only.
Review the call settings and output variables shown on the node. These come from your agent configuration.
Save the node.
Connect it to any downstream node to pass the call data forward.
Save the workflow, then turn it on.
There is no input mapping on this node. The workflow does not control the call. The agent handles the conversation live, and the workflow continues only after the call ends.
Note: A workflow can have only one trigger, and Incoming Voice Call can only be used as a trigger.
Note: To change the agent, call settings, or output variables, go back to the agent builder. They cannot be edited from the node.
Note: When a customer calls in and triggers this workflow, any other workflow that contact is currently in will stop. Only the new inbound workflow will continue running for them.
5. How to set up a Make AI Call action
Use this node when a business event should trigger an outbound AI call.
Drag the Make AI Call node onto the canvas.
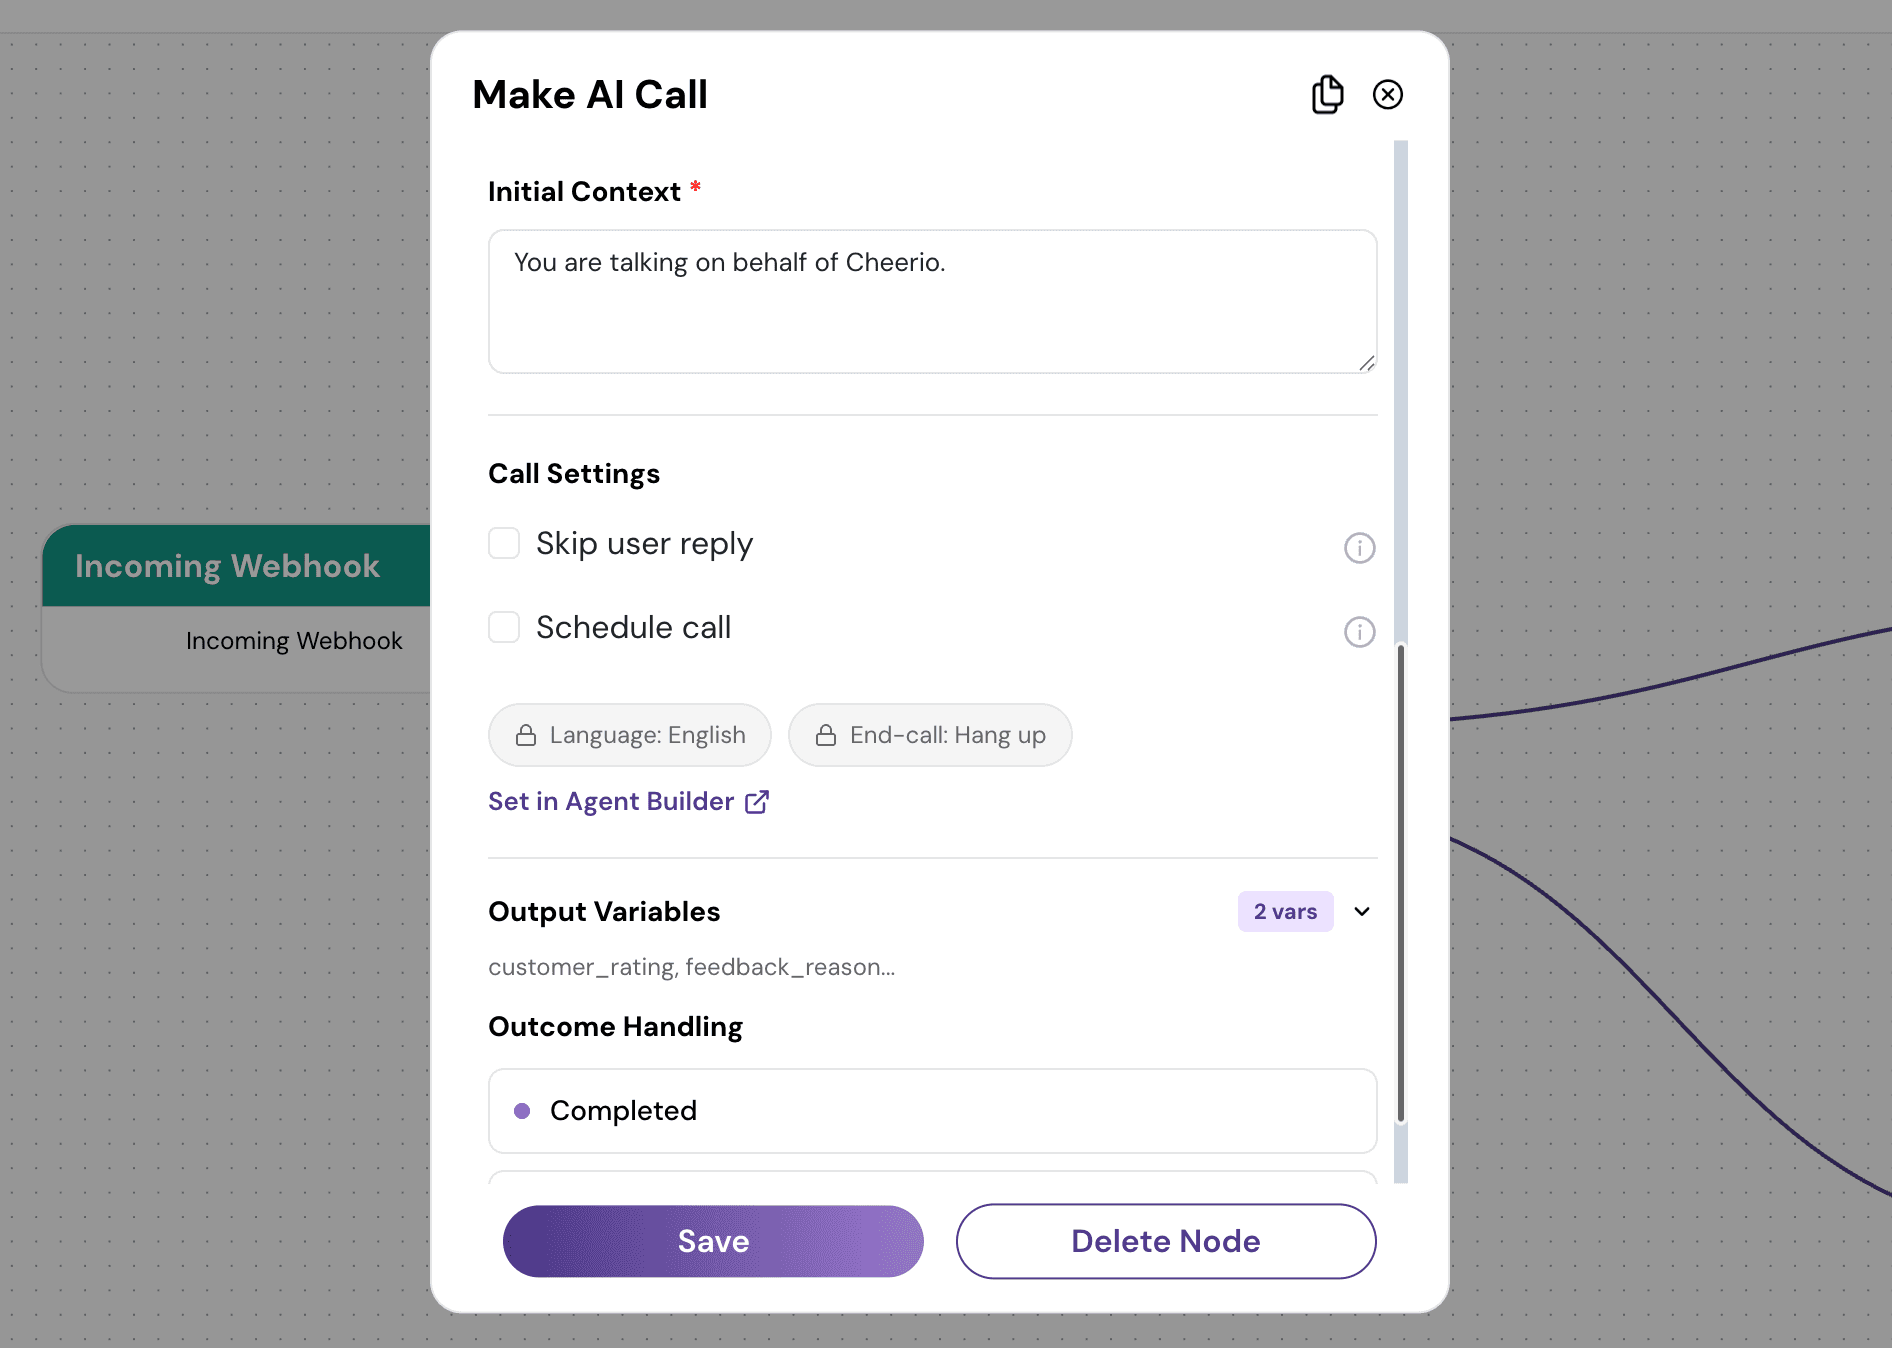
Select the phone number the call will be placed from. The linked agent is selected automatically.
Map each prompt variable to a contact attribute or a workflow variable. Every prompt variable must be mapped before you can save.
Add Initial context if you need it. This is optional.
Set Skip User Reply on or off.
Set Schedule call if the call should go out at a specific time.
Save the node.
Where the recipient number comes from
The number the call goes to has to come from data your workflow already has. It depends on how your workflow starts:
Your workflow starts with | Where the number comes from |
Incoming WhatsApp | The contact's number comes through automatically. Nothing to set up |
Incoming Webhook | Your webhook payload has to include the mobile number against the key listed in our API documentation. It then shows up as a workflow variable you can map |
Contact attribute or another trigger | Automatically mapped from the contact attribute holding the number |
The number can come from two places: a workflow variable, including a value received in a webhook payload, or a Cheerio contact attribute.
Note: If your webhook does not send the number against the correct key, the workflow will save and turn on without error. The problem only shows up when the call is attempted, and that call will fail. Check your payload against the API documentation before you go live.
Note: We cannot pass variables/ attributes in the input context field. Those can be passed only via mapping to the agent’s configured variables.
What the agent can refer to during the call
If you want the agent to mention any workflow variable/ attribute during the conversation, you have to add that value as a variable in the agent's prompt in agent configuration first. Then map it on the node.
Anything not in the agent's prompt is not available to the agent while it is on the call.
Initial context
Use this field to give the agent extra background for the workflow specific conversation. It accepts plain text only.
Note: Initial context cannot include variables or attributes. If you need the agent to use data from the workflow, add it as a prompt variable in the agent configuration instead, then map it in step 3 above.
Skip User Reply
Setting | What happens | Branches | Call data |
Off (default) | The workflow waits for the call to finish before moving on | Two - Completed and Failed | Available in later nodes |
On | The workflow moves ahead immediately without waiting | One | Not available |
Keep it off if you want to use call data later in the workflow, or branch on whether the call succeeded.
Schedule call
Set the call to go out at a fixed date and time, or pull the time from a workflow variable or contact attribute.
If Skip User Reply is off, the workflow waits until the scheduled call completes, then continues.
If Skip User Reply is on, the workflow continues immediately and the call is still placed at the scheduled time.
Outcome branches
When Skip User Reply is off, connect a follow-up to each branch:
Completed - the call connected and finished.
Failed - the call did not connect. This includes calls the customer did not answer.
Note: Each call is attempted once. If the customer does not answer, the workflow takes the Failed branch. To try again, connect a Delay node to the Failed branch followed by another Make AI Call node.
6. Using call data in later workflow steps
When Skip User Reply is off, the voice node lists the output variables it passes forward, for example Customer Rating.
Use them in downstream nodes such as:
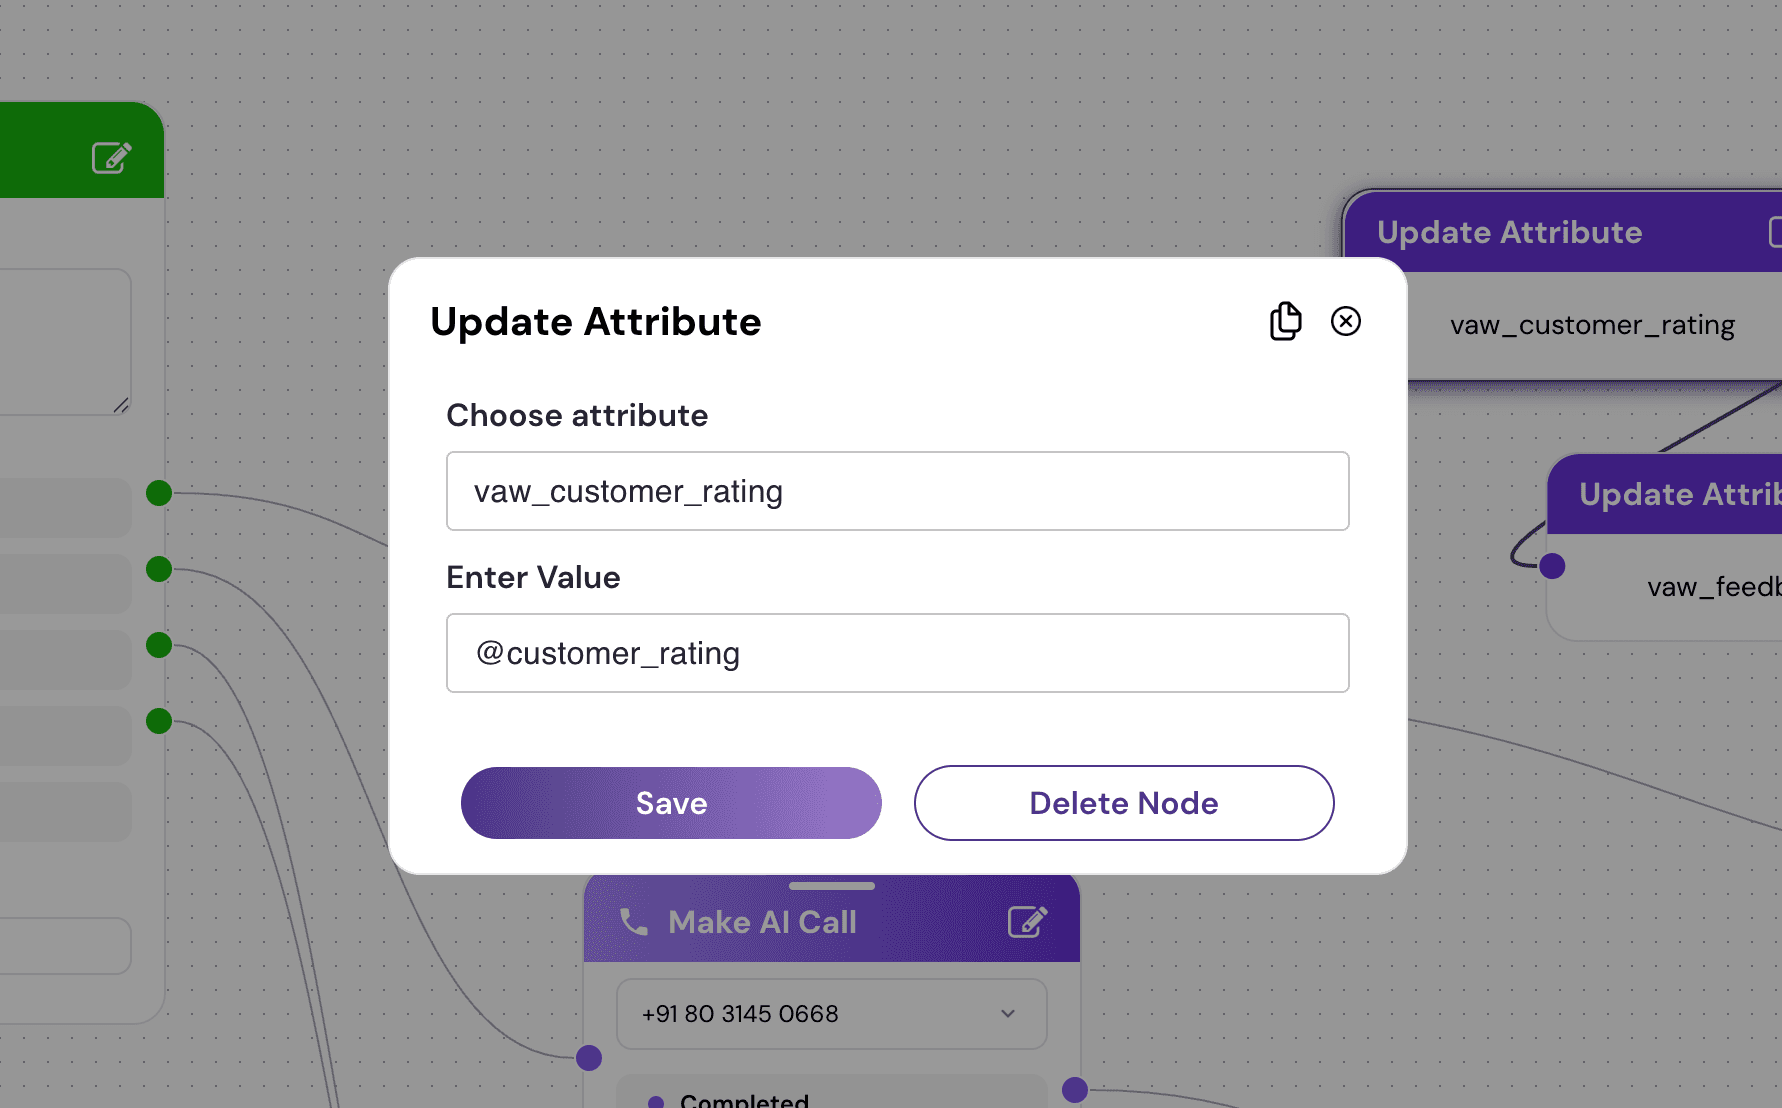
Update Attribute - save the captured value against the contact.
Condition - branch the workflow based on what the call captured.
WhatsApp, Email, or SMS - personalise the follow-up message.
Example: After an Incoming Voice Call node, add an Update Attribute node. Choose the attribute to update, then set its value to the output variable, such as Customer Rating in order to save it to your label. You can also use that variable anywhere later in the same workflow.
7. Saving and turning on your workflow
There are three steps, and each runs its own checks:
Save the Voice AI node. Checks your node setup - the agent, your prompt variable mapping, and your schedule settings.
Save the workflow. Checks that every node on the canvas is complete and that all outcome branches are connected.
Turn the workflow on. Checks your account setup - wallet balance and number status.
Note: Workflows that start with an Incoming WhatsApp trigger go live as soon as you save them and have no on/off toggle. Every other workflow needs to be turned on including any workflow using the Incoming Voice Call trigger node.
8. Viewing call analytics
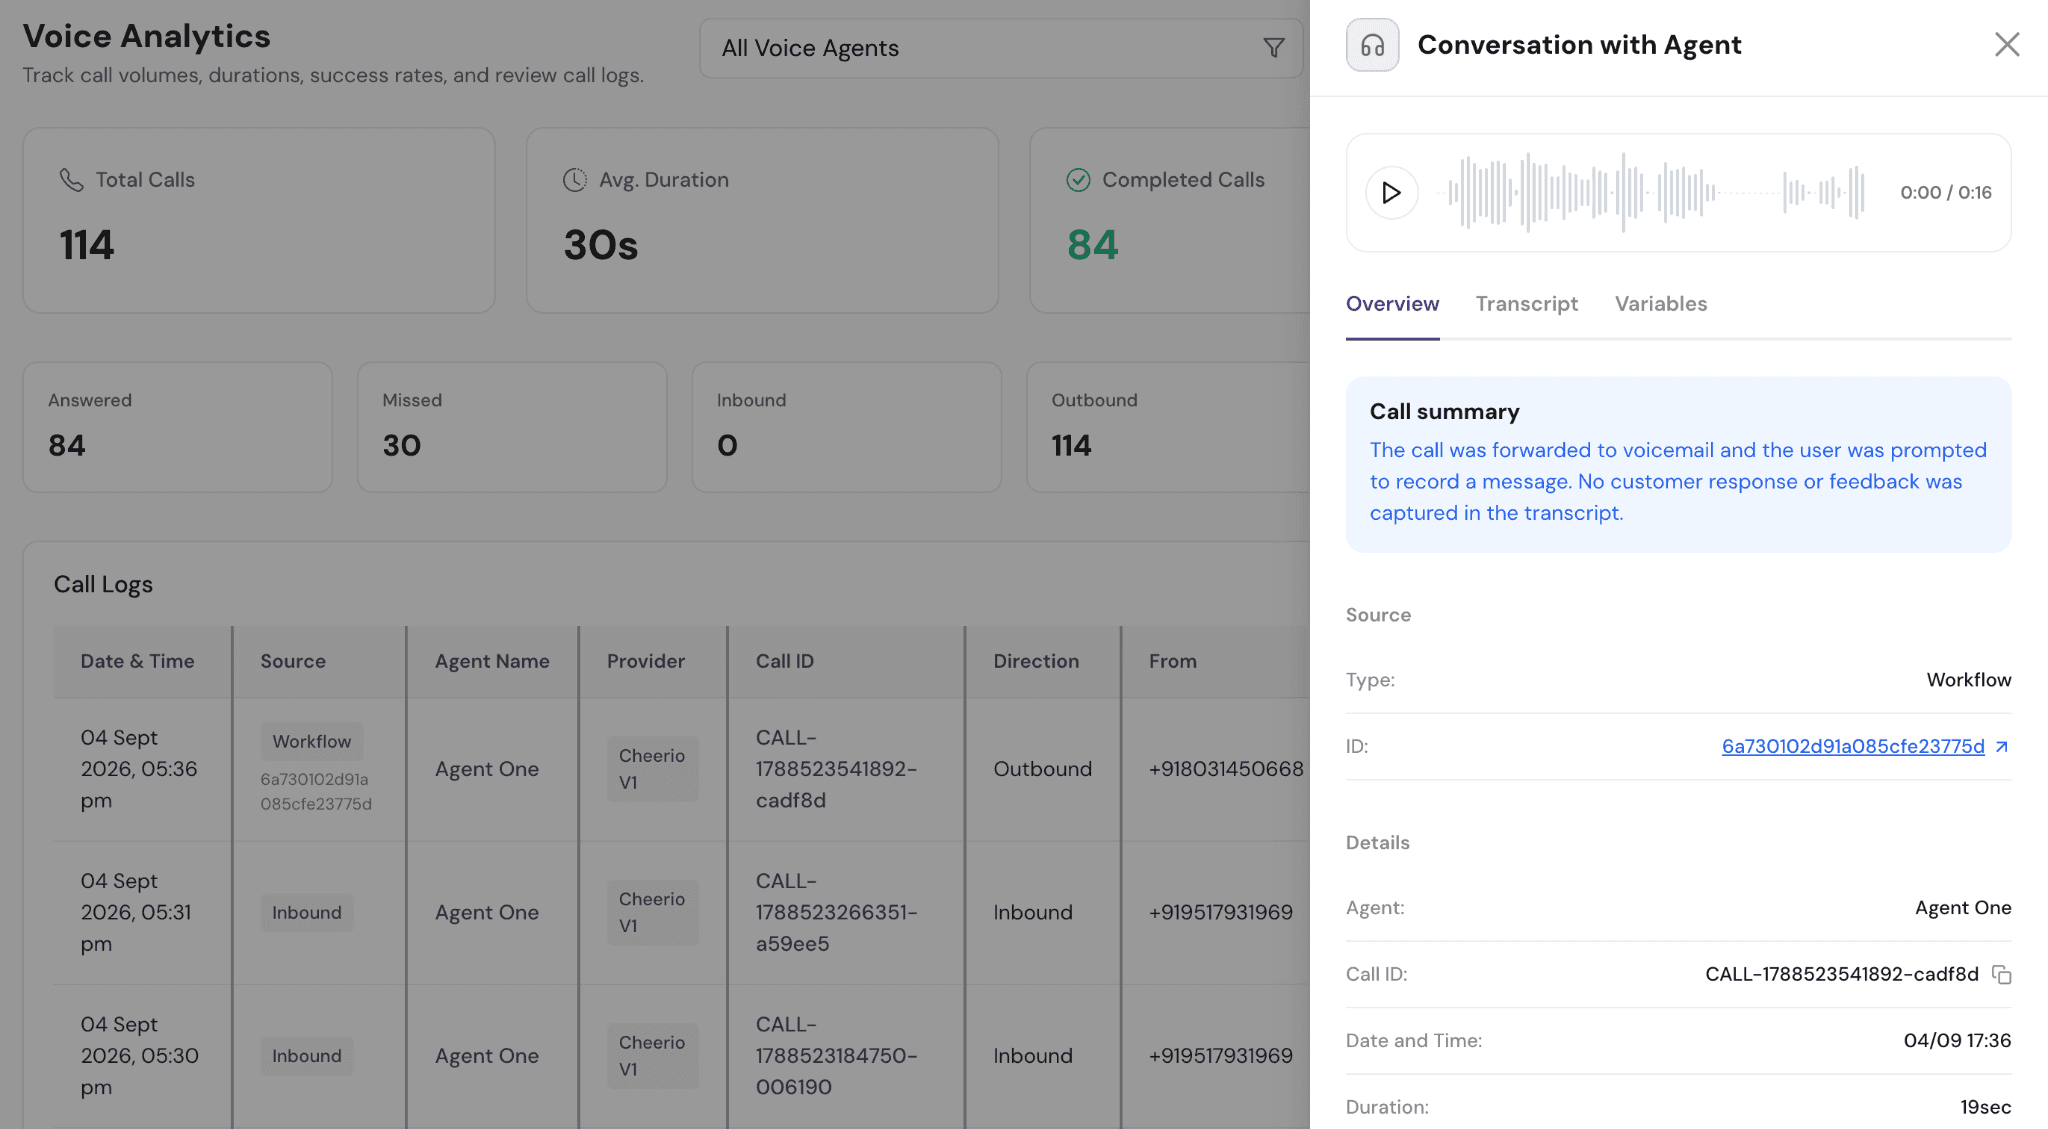
All Voice AI calls appear in the Voice AI Agents Analytics module.
The Source column sits just before the Agent Name column and shows where each call came from:
Source | What it means |
Workflow name | The call was placed by a Make AI Call node, or the inbound call started a workflow |
Inbound | An inbound call that did not start a workflow |
Outbound | An outbound call not linked to a workflow |
Use the Source filter to narrow the table by category: Workflow, Inbound, or Outbound.
Click any call to open the details panel. The Source section at the top shows Source Type and Source ID. Source Type and Source ID appear for workflow calls only.
9. Limits to be aware of
The agent only knows what is in its prompt. In order to use the workflow variables, it’s required to map the variables with the agent’s variables defined in the prompt.
Webhook number errors only show up at call time. A payload missing the recipient number key will not block save or turn-on. Please test the workflow thoroughly.
Only one live workflow per inbound number, and turning one on switches the other off. This applies to the Incoming Voice Call trigger. If you turn on a workflow for a number that another live workflow is already using, that other workflow is switched off automatically. You will not be asked to confirm, and you will not get a notification.
Outbound is not restricted. Several workflows can place calls from the same number and agent using Make AI Call.
One attempt per call. There is no automatic retry.
Two outcomes only. Calls resolve as Completed or Failed.
Inbound calls stop other workflows. If a contact calls in and triggers an inbound workflow, any workflow they were already in stops.
Agent edits apply straight away, with no warning. Agents and workflows are not versioned. If you edit an agent that a live workflow uses, the change takes effect on the very next call. Nothing tells you which workflows are affected. Adding or renaming a prompt variable will leave those workflows with an unmapped input, and renaming or removing an output variable will silently stop it reaching your downstream nodes. Check every workflow using that agent after you edit it.
Voice AI Campaigns run separately. A campaign call cannot start a workflow.
10. Common issues and validations
Issue | What you will see | How to fix |
Agent not configured on the node | Node save blocked | Select a phone number with a linked agent |
Prompt variable not mapped | Node save blocked | Map every prompt variable to an attribute or workflow variable |
Number or agent not eligible | They do not appear in the dropdown | Make sure you have a working number with an agent assigned to it. |
Insufficient balance | The workflow is not triggered for the Incoming call node, and the workflow stops after the Make AI call node. | Top up your wallet |
Rented number released or expired | Cannot turn the workflow on, or the call fails and takes the Failed branch | Renew the number or select a different one |
Call fails immediately on a webhook-triggered workflow | Call takes the Failed branch, no connection attempt | Check the webhook payload includes the mobile number against the key in the API documentation |
Agent does not mention a detail you mapped | Call connects but the agent never refers to the value | Add the value as a variable in the agent's prompt, then map it on the node |
Call data not available in later nodes | No output variables listed on the node | Check that Skip User Reply is off, and that output variables are defined in the agent |
11. Need help?
For any details or queries, reach out to our support team.