This guide will help you set up and start using AI Voice Agents on Cheerio. The system is designed to automate both inbound and outbound calls using AI, while also giving you full visibility into performance and outcomes.
The setup follows a simple flow:
Get a number → Create an agent → Configure calling → Run campaigns → Track performance
1. Complete Compliance Verification (Required Before Renting a Number)
Before renting a phone number for AI voice calls, you must first complete the Compliance verification process. This step is mandatory to ensure adherence to telecom regulations defined by TRAI and DoT. Without compliance approval, phone numbers cannot be rented or activated.
Navigate to:
Compliance → New Application
The compliance process usually takes 2–3 business days for review and approval.
During the application process, you will need to:
Enter your application name and email address
Select your country and number type (Local)
Provide business details such as registration number, address, city, state, and postal code
Upload your Registration Certificate and GST Certificate in PDF format (under 5MB each)
Accept TRAI and DoT compliance terms, including obtaining user consent before calls and avoiding unsolicited communication
Once submitted, your application will go through a review process. You can track statuses like:
Pending Review
Approved
Rejected
Requires Changes
Only approved compliance applications can proceed to phone number rental.
2. Create Your Voice Agent
Once your number is ready, the next step is to create the AI agent that will actually talk to your customers.
A Voice Agent is essentially your AI caller or receiver. It follows instructions, responds intelligently, and can extract useful information from conversations.
While creating an agent, you define:
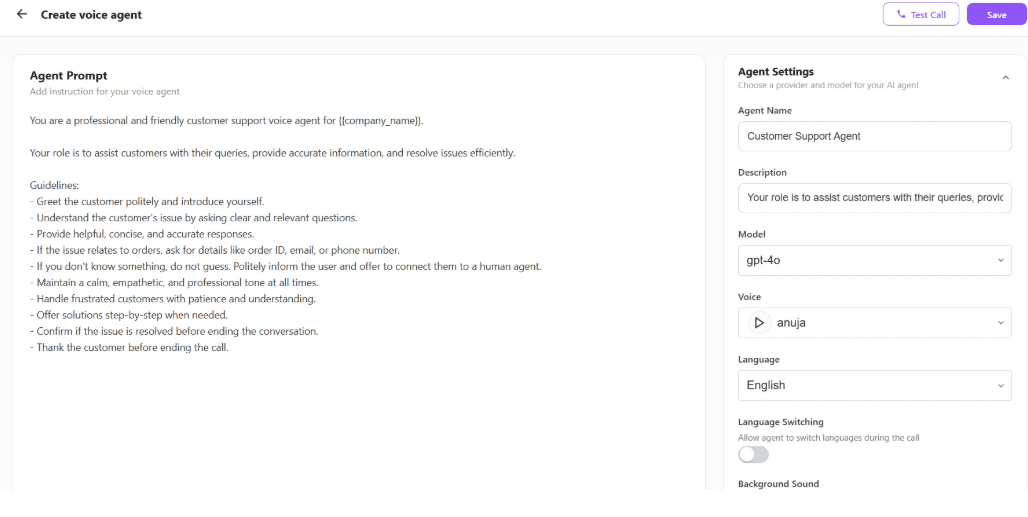
Agent Name & Description → Helps you identify its purpose (e.g., Sales Agent, Support Agent)
Agent Prompt → This is the most important part. It defines how the agent behaves, what it says, and how it handles conversations
Voice & Language → Choose how the agent sounds and which language it speaks
Model → AI engine powering the conversation
Knowledge Base (Optional) → Upload PDFs so the agent can answer questions based on your business data
You can also enable built-in tools:

End Call → Allows agent to terminate conversation when complete
Transfer Call → Redirect to another number or human agent
Extract Variables → Capture structured data like name, interest, feedback
Think of this step as “training your AI employee” before putting it on calls.
3. Connect Agent to Number
After creating your agent, you must connect it to your phone number.
This step ensures:
All incoming calls go to the assigned AI agent
All outbound calls use the selected number and agent combination
Once mapped, your system is now fully ready to handle real calls.
4. Run Voice Campaigns (Outbound Calling)
Now that your setup is complete, you can start automated calling using Voice Campaigns.
A Voice Campaign allows you to call multiple users automatically using your AI agent.
To create a campaign:
Enter a campaign name and description
Select your audience (uploaded via contact list or labels)
Choose the Voice Agent that will make calls
Set retry logic (0–10 attempts) for unanswered calls
Once launched:
The system starts calling users one by one
The AI agent handles the conversation
If a call is not answered, retries are triggered automatically
All results are logged in the system
This is ideal for:
Lead qualification
Sales outreach
Feedback collection
Reminders and follow-ups
5. Handle Inbound Calls
Inbound calls work automatically once your number and agent are configured.
When a customer calls your number:
The system routes the call to your assigned AI agent
The agent starts the conversation based on its prompt
It can answer questions, collect data, or perform actions
Call data (duration, outcome, variables) is stored
This allows you to run a 24/7 automated call center without human agents.
6. Track Performance with Voice Analytics
Once your AI Voice Agents start handling calls, you can monitor everything from the Voice Analytics dashboard. This section gives you complete visibility into call activity, agent performance, and conversation outcomes across both inbound and outbound calls.
At the top of the dashboard, you can quickly view important metrics such as:
Total Calls
Average Call Duration
Completed Calls
Failed Calls
You can also filter analytics by specific Voice Agents and selected time ranges to better understand performance trends.
The Call Logs section provides a detailed breakdown of every call handled by the system. For each interaction, you can view the date and time, call ID, call direction, phone numbers involved, duration, and final call status.
Additionally, each call log can be opened to access deeper conversation insights, including:
Call recordings
AI-generated summaries
Full conversation transcripts
Agent details
Call outcomes
These insights help you review conversation quality, improve agent prompts, optimize campaign performance, and monitor customer interactions more effectively over time.
7. Best Practices for Better Results
To get the most out of Voice Agents:
Write clear and structured prompts (define tone, goal, and flow)
Use variable extraction to capture useful data
Start with small campaigns, then scale
Monitor analytics and iterate regularly
Enable call recording for quality checks